

How Market Targeting Works in AI Upsell & Cart ‑ WeUpsell:
- Shoppers Only See Their Own Market: Customers only see the widget assigned to their Shopify Market (for example, shoppers in India see the India campaign, while global visitors see the International campaign).
- All Markets Widgets Show Everywhere: Any widget set to All markets shows in every country, unless a specific market widget overrides it.
- Existing Widgets Don't Change: All your existing widgets stay on All markets by default. Nothing changes until you choose a specific market.
💡 Example: Free Shipping for International ($450) vs India (₹899):
You can easily set different goals and rewards for different countries:
1. International Campaign: Set the market to International with a $450 USD free shipping goal.
2. India Campaign: Set the market to India (INR) with a ₹899 INR goal and a ₹100 discount coupon (FREE100).
Shoppers in India only see the ₹899 goal, and shoppers outside India only see the $450 goal.
📋 Before You Begin
- ✓Install AI Upsell & Cart ‑ WeUpsell from the Shopify App Store on your store.
- ✓Ensure you have configured your regional shipping zones in Shopify Admin → Settings → Shipping and delivery.
- ✓Ensure your markets (e.g. India, International, Canada, United States) are created and active in Shopify Admin → Markets.
1Initial Setup Part 1: Configure Shipping Profiles & Zones in Shopify (2 Steps)
Before configuring market-specific widgets in AI Upsell & Cart ‑ WeUpsell, ensure the shipping profiles and regional rates you want to promote are set up in your store's Shopify settings:
Step 1: Open Shipping Profiles in Shopify Settings
- From your Shopify Admin, click Settings (gear icon in the bottom-left).
- Select Shipping and delivery from the left sidebar menu.
- Under Shipping profiles, click on General profile (or your primary custom shipping profile).
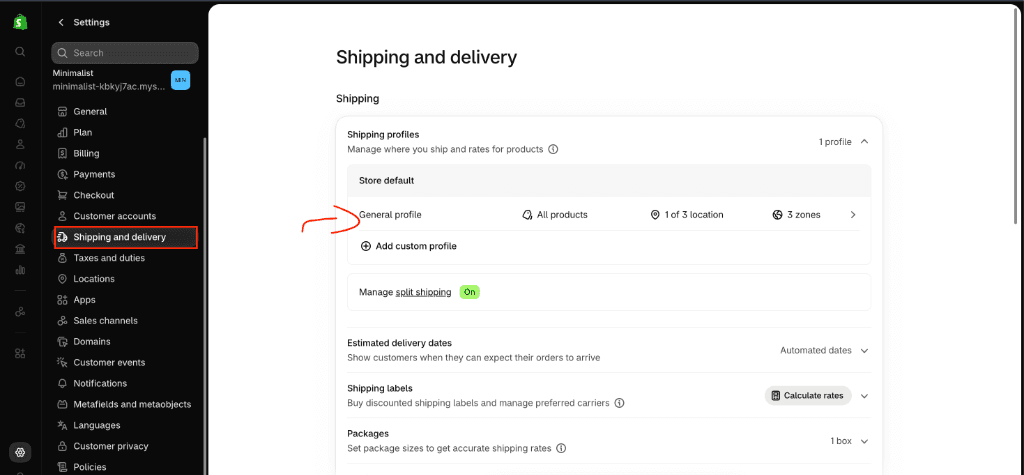
Step 2: Add Your Shipping Zone & Regional Rates
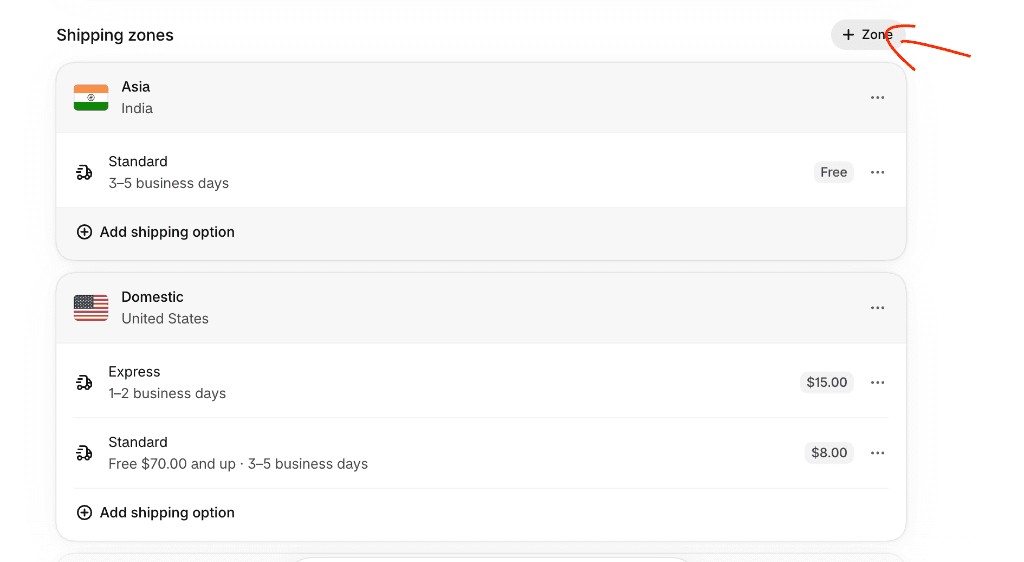
- Scroll down to Shipping zones and click + Zone in the top-right corner.
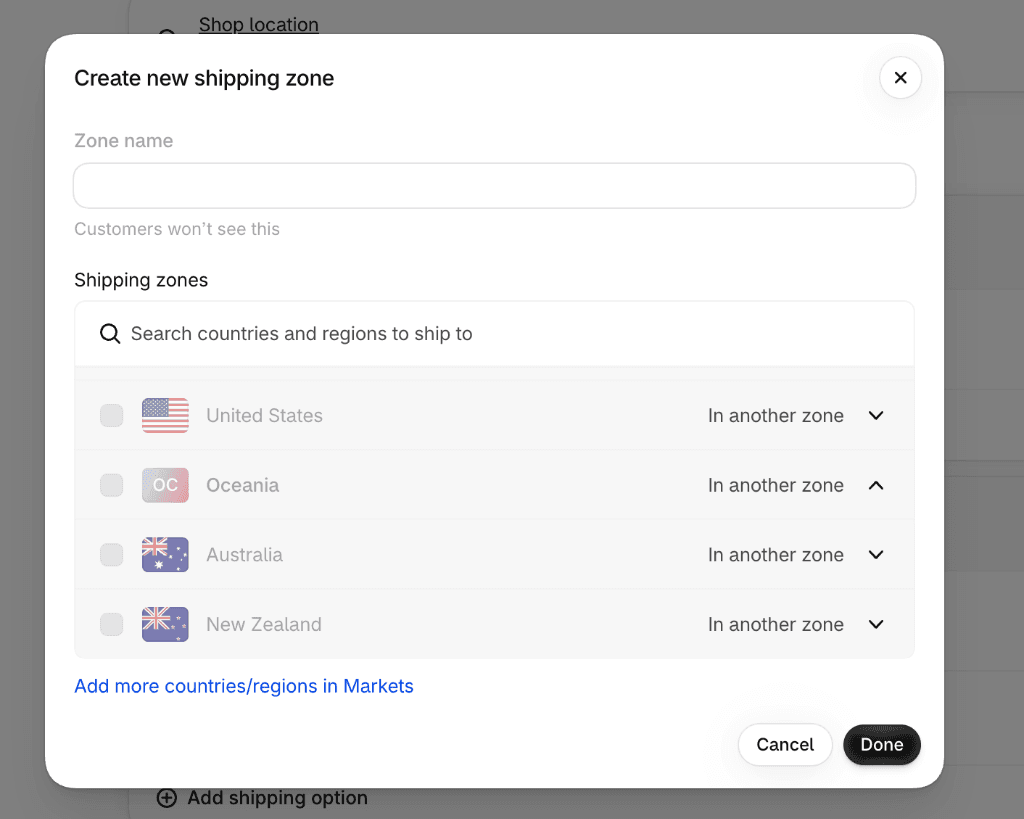
- Enter your Zone name (e.g. Asia - India or International), search and check the countries/regions to include, and click Done.
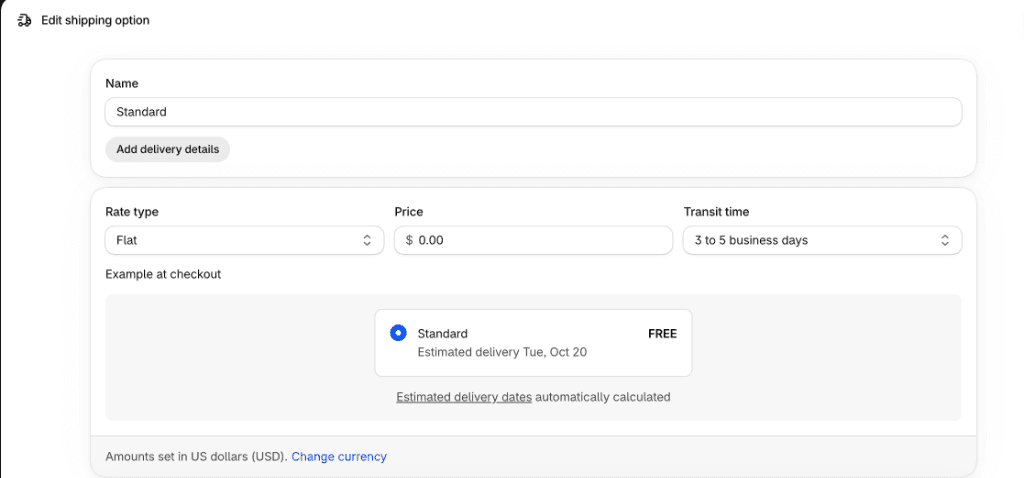
- Click Add shipping option (or edit an existing rate) to set your rates (e.g. Standard Free Shipping for orders meeting your threshold or flat rates).
1. Click + Zone in Shipping Zones:
2. Select Countries & Regions:
3. Configure Regional Shipping Rates (e.g. Free Shipping):
💡 Shipping Rates Connected: Your regional shipping profiles are now active in Shopify. Next, ensure the market is created in Shopify Markets so WeUpsell can target it.
2Initial Setup Part 2: Create & Activate Your Market in Shopify
Now make sure your target countries are organized into an active market in Shopify Markets:
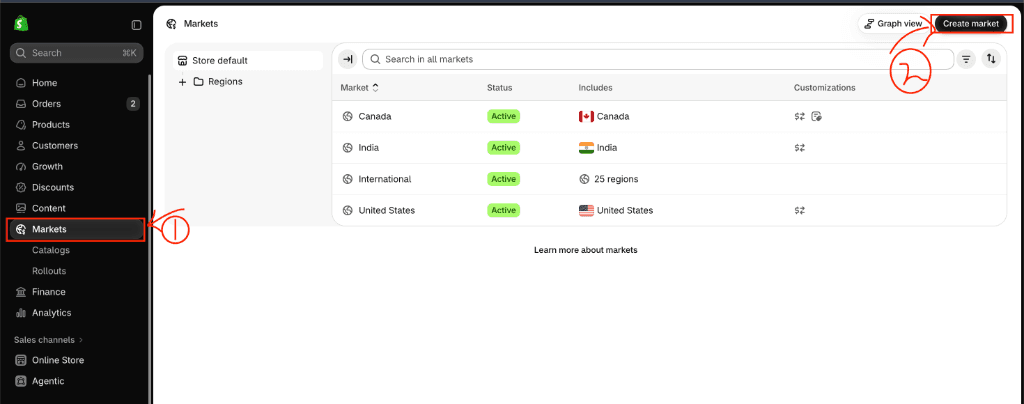
1. Navigate to Markets & Click "Create market"
- In your Shopify Admin left sidebar, click Markets (marked as 1).
- Review your existing markets (e.g. Canada, India, International, United States).
- Click the Create market button in the top-right corner (marked as 2).
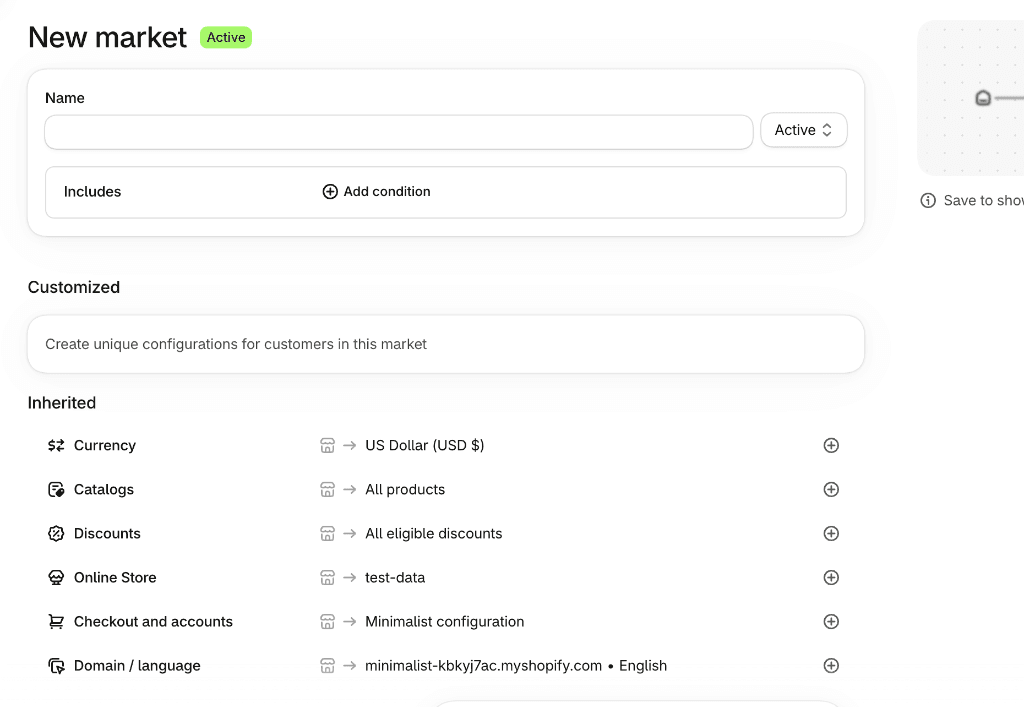
2. Name Your Market, Select Countries/Regions & Save
- In the New market form, type a recognizable Name for this market (e.g., India or International), and make sure the market status toggle is set to Active.
- Under the Includes card, click + Add condition.
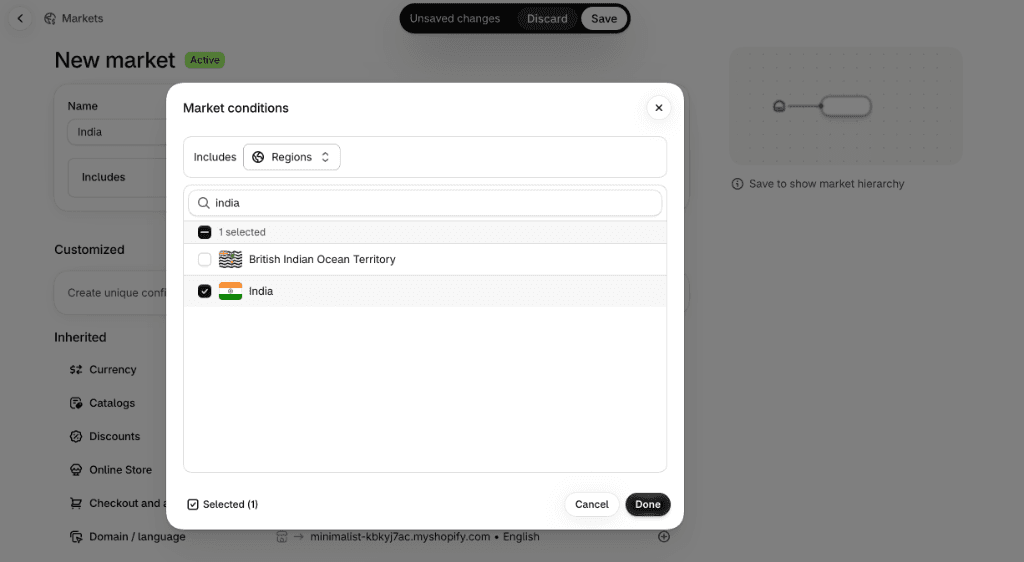
- In the Market conditions popup (with Includes: Regions selected), type your target country in the search box (e.g. search "india") and check the box next to it.
- Click Done at the bottom of the modal, then click Save in the top header bar to activate the market.
A. Enter Name & Click + Add condition:
B. Search Country, Click Done & Save:
✨ Shopify Markets Synced: With your market created and active, AI Upsell & Cart ‑ WeUpsell automatically syncs it. Now follow the steps below in the app to create your market-targeted upsell widget!
Set Up Your Market Widgets in AI Upsell & Cart ‑ WeUpsell
Follow the 5 steps below inside the AI Upsell & Cart ‑ WeUpsell app to isolate, customize, and publish your market-specific widgets:
1Step 1: Open the Widget Campaign You Want to Change
Navigate to your AI Upsell & Cart ‑ WeUpsell dashboard to view your campaigns across all formats (Cart Drawers, Product Page Upsells, Volume Discounts, and Popups):
- In your Shopify Admin, click Apps and select AI Upsell & Cart ‑ WeUpsell.
- From the left-hand navigation menu, click Campaigns.
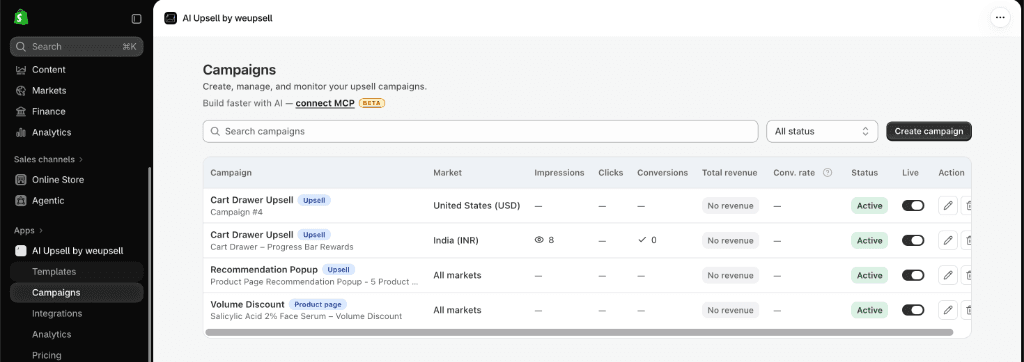
- Review the Market column in your Campaigns table. As shown in the screenshot below, WeUpsell clearly displays the targeted market for every campaign:
- Cart Drawer Upsell: Market set to United States (USD)
- Cart Drawer Upsell (Progress Bar Rewards): Market set to India (INR)
- Recommendation Popup: Market set to All markets
- Volume Discount: Market set to All markets
- Click the Edit (pencil icon) next to the widget campaign you want to customize, or click the Create campaign button in the top right to build a new one.
2Step 2: Click Market and Pick a Market from the Dropdown
In the campaign editor, you can assign the widget to any of your synced Shopify Markets with a single click:
- In the top editor toolbar, make sure you are on the Settings tab (alongside Offer, Design, and Triggers).
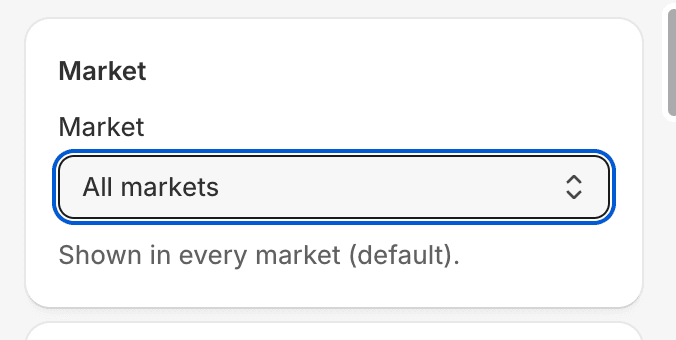
- Locate the Market card on the left panel. By default, every widget is set to All markets (with the subtext Shown in every market (default)).
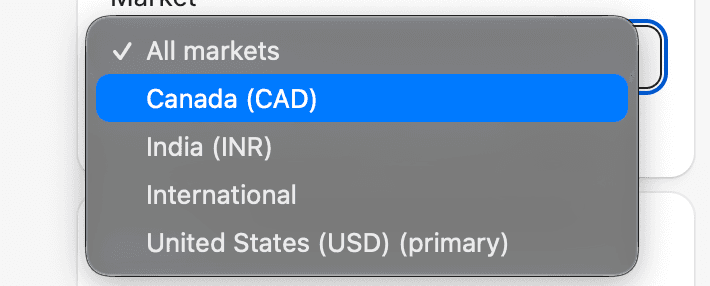
- Click the Market dropdown. WeUpsell automatically reads all markets configured in your Shopify store:
- All markets (default fallback)
- Canada (CAD)
- India (INR)
- International
- United States (USD) (primary)
- Select your target market (e.g. choose India (INR) for domestic customers or International for global buyers).
Default Setting (All markets):
Selecting a Shopify Market:
⚠️ Market Targeting Notice: Once you select a market such as India (INR), WeUpsell displays the active covered countries (Countries: IN) and a confirmation banner:
"This offer will only show for shoppers in India. It will not appear in any other market. Covered countries: IN. To reach another market, create a separate offer and select that market."
3Step 3: Add Offers & Localized Tiered Rewards
Customize offer content and reward thresholds for your target market's currency:
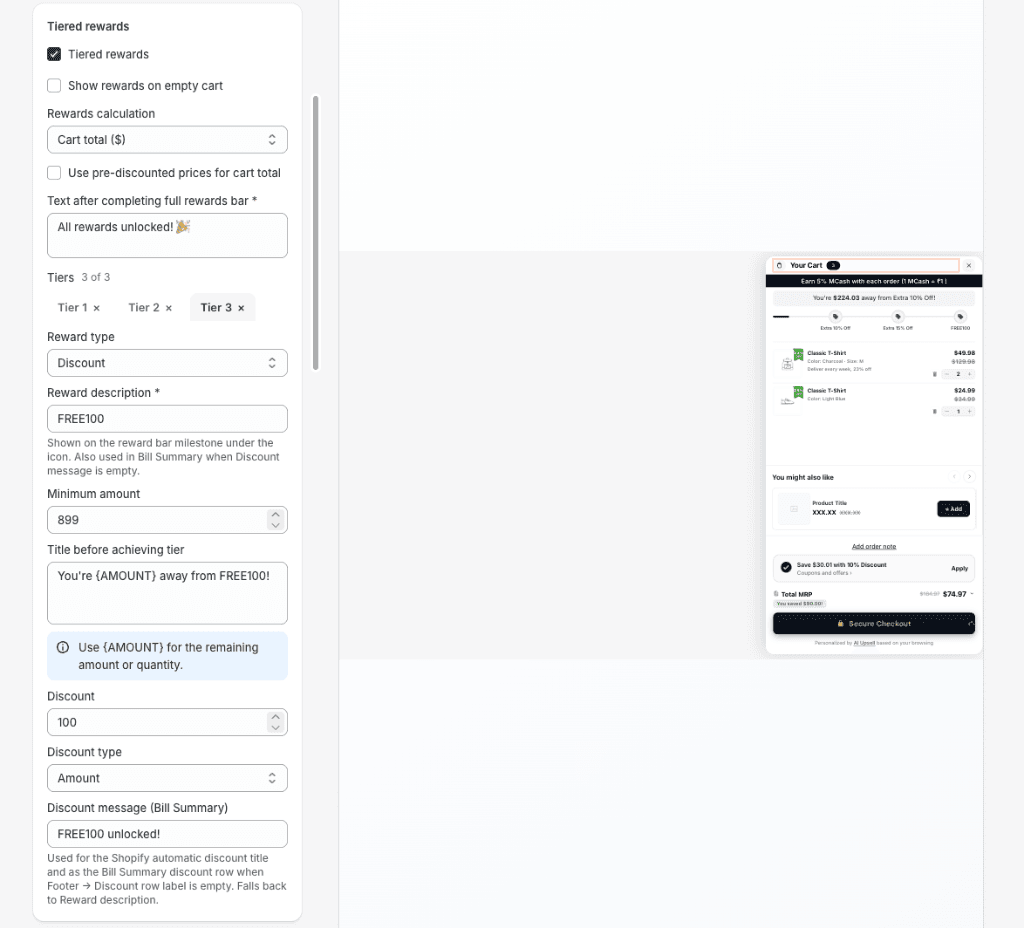
- Enable Tiered Rewards: Check Tiered rewards to turn on the cart drawer progress bar.
- Set Localized Milestones: Configure regional spending goals (e.g., Minimum amount:
899for ₹899, Reward: DiscountFREE100of100). - Dynamic Copy: Use the
{AMOUNT}tag to show remaining spend (e.g., "You're {AMOUNT} away from FREE100!"). - Check Live Preview: Verify milestones, in-cart recommendations, and checkout buttons in the real-time preview on the right.
4Step 4: Make the Widget Live
Turn on your widget so shoppers in that market can see it:
- Go to your Campaigns list in AI Upsell & Cart ‑ WeUpsell.
- Find your campaign and toggle the Live switch to ON.
- The status will show as Active with your chosen market (e.g. India (INR)) shown in the table.
5Step 5: Repeat for Each Other Market with Its Own Widget
Set up dedicated widgets for your other regional markets:
- Click Create campaign to make a new widget for another market (for example, select International with a $450 USD free shipping goal).
- Add the offers, text, and conditions for that market only.
- Make that widget live.
- Repeat these steps for each market that needs its own widget.
💡 Tip for Global Stores: Keep one widget set to All markets as a fallback. If a customer visits from a country that doesn't have a dedicated market widget, they will automatically see this default widget.
✨Supported Campaign Templates
Shopify Market targeting is supported across these 5 WeUpsell campaign templates:
🛒 Cart Drawer Upsell
Set different progress bar goals per market (e.g., $450 for International vs ₹899 for India) plus localized in-cart cross-sells.
📦 Product Page Upsell
Recommend market-specific add-ons, bundles, and frequently bought together items based on local inventory.
✨ AI powered Product Upsell
Display intelligent AI recommendations with countdown bars and custom badges tailored to each country market.
🏷️ Volume Discount
Configure quantity break tiers (e.g., *Salicylic Acid 2% Face Serum Volume Discount*) with localized currency prices.
💬 Recommendation Popup
Trigger market-targeted exit intent or add-to-cart popups with localized promotional banners and coupon codes.
✅ How to Verify Your Multi-Market Widgets
- ✓Test with Shopify Country Selector: Use your store's storefront country selector or a localized URL path (e.g.
store.com/en-invs international) and verify that the widget changes dynamically. - ✓Check Milestone Thresholds: Confirm that the India campaign displays the ₹899 INR goal with
FREE100, while the International campaign shows the $450 USD threshold. - ✓Verify Out-of-Stock Protection: Confirm that sold-out variants cannot be added to the cart by shoppers.
- ✓Test Other Campaign Types: Verify your Product Page Upsells, Volume Discounts, and Popups in each market.
- ✓Check All Markets Fallback: Visit from an unspecified region and verify that your default "All markets" campaign appears.
❓ Frequently Asked Questions
Will creating a market-specific widget break my existing campaigns?
No. All existing campaigns remain assigned to All markets by default. They continue to display normally for all visitors until you explicitly designate a campaign to a specific Shopify Market.
Can I set up market targeting for Volume Discounts and Popups too?
Yes! Market targeting works across supported campaign types—including Cart Drawers, Product Page Upsells, AI powered Product Upsells, Volume Discounts (Quantity Breaks), and Recommendation Popups. Each supported template lets you select a specific market or keep it on All markets.
What happens if an international customer visits when only an India campaign is active?
If you have an active fallback campaign set to All markets, the international customer will see the fallback campaign. If you only have the India campaign active and no fallback, the widget will simply not appear for international shoppers, ensuring irrelevant offers and domestic currencies are never shown.
Can shoppers add sold-out product variants from the upsell widget?
No. WeUpsell automatically blocks sold-out variants from being added to the cart. If a product or variant has zero inventory in that market, the add button is disabled or the sold-out offer message is shown according to your Stocks configuration.
How does WeUpsell detect which market a shopper belongs to?
WeUpsell integrates directly with native Shopify Markets. It reads the shopper's active localized storefront session, which is determined by Shopify via IP geolocation, storefront country selectors, and localized subfolders or domains (e.g. store.com/en-in).
💬 Need Help?
If you need any help setting this up, contact our support team. We're happy to walk you through the steps or answer your questions.