

Most Shopify stores have the same quiet problem: customers buy one unit and leave. A volume discount ("Buy 2, save 5%. Buy 3, save 10%") is one of the simplest ways to change that. But setting it up usually means opening a dashboard, picking a template, configuring tiers, styling badges, and testing on mobile. Doing it per product makes it even slower.
With WeUpsell connected to Claude through MCP (Model Context Protocol), you can describe the offer once in plain language and have it apply across every product in your store. In this post, we'll build it and show how it looks on a real storefront.
New here? Connect Claude to your store first: How to connect MCP with AI tools.
Why One Offer for All Products Works
Instead of building a separate offer for each product, a store-wide volume discount gives you:
- Consistency: Every product page shows the same 'Buy more, save more' experience.
- Speed: One prompt replaces dozens of manual setups.
- Easy updates: Change the discount once and it updates everywhere.
Our goal: move shoppers from 1 unit to 2 or 3 units on any product page.
The Final Result
Here is how the offer appears on a live product page (we're showing a protein oats product from our demo store, but the same offer automatically adapts to every product across your store):
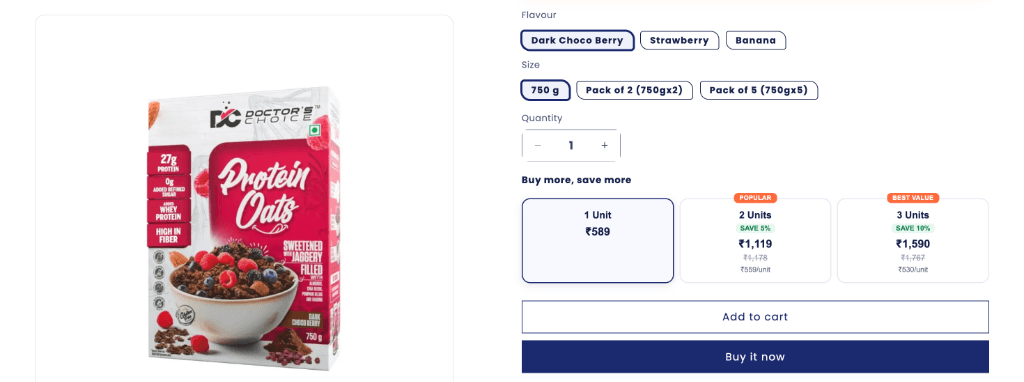
| Option | Badge | Discount | Example Price | Original Price | Per Unit |
|---|---|---|---|---|---|
| 1 Unit | None | None | ₹589 | — | ₹589 |
| 2 Units | Popular | 5% | ₹1,119 | ₹1,178 | ₹559 |
| 3 Units | Best Value | 10% | ₹1,590 | ₹1,767 | ₹530 |
Prices adjust automatically to each product's own price. A few key details do a lot of the heavy lifting:
- Badges ('Popular', 'Best Value') guide undecided shoppers toward higher tiers.
- Strikethrough pricing highlights the dollar savings instantly.
- Per-unit price makes the 3-pack feel like the most cost-effective choice.
- Default selection on 1 unit keeps the buying experience low-pressure and customer-friendly.
The Prompt We Gave Claude
"Using WeUpsell, create a volume discount that applies to all products in my store. Tiers: - 1 unit at full price - 2 units with 5% off, labeled 'Popular' - 3 units with 10% off, labeled 'Best Value' Show the original price struck through and the price per unit on the discounted tiers. Keep it as a draft so I can review it first."
Why this prompt works so effectively:
- Sets the scope: Specifying 'all products' ensures the campaign isn't limited to a single item.
- Defines exact tiers and percentages: Leaves zero ambiguity for the AI.
- Specifies labels and display details: Ensures badges, strikethrough prices, and per-unit math match your brand vision.
- Requests a draft first: Keeps your storefront safe until you have reviewed the configuration.
What Claude Did Behind the Scenes
- Checked the available WeUpsell templates and picked the volume discount layout.
- Created a draft campaign from that template.
- Updated the offer: set scope to all products, defined quantity tiers, and applied discount values.
- Updated the copy and design: configured badge text, headline, and styling.
- Reported back with a complete summary of the drafted campaign.
Review Before You Publish
Because a volume discount changes what customers pay, always review the draft first. Verify that:
- The offer applies to the products and collections you expect.
- Discount percentages match your profit margin requirements.
- Prices and per-unit values display accurately on a few different product pages.
- The layout renders cleanly on both desktop monitors and mobile devices.
When you're happy with the result, tell Claude:
"Looks good. Publish this offer."
Refine It with Follow-Up Prompts
Once the draft exists, you can refine almost anything with a single sentence.
1. Change the Offer Type
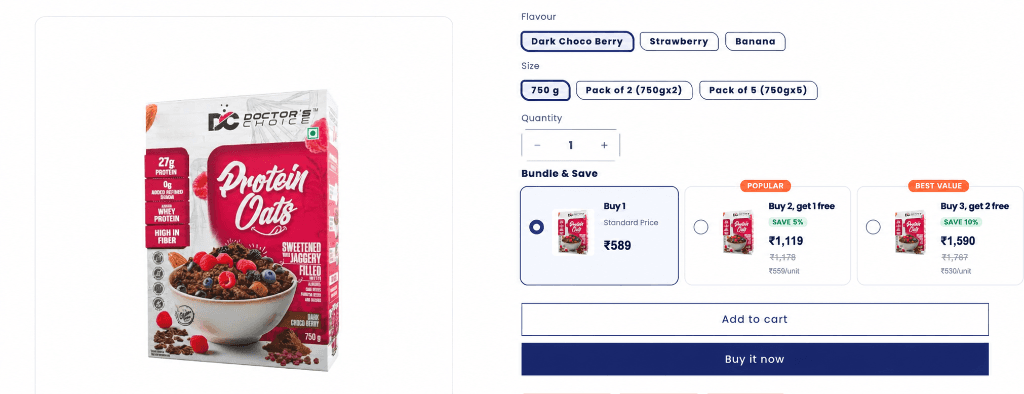
- Quantity breaks: Buy more of the same product to unlock bigger savings (what we built above).
- Buy X, get Y: Buy items and get others free or discounted.
To switch from tiered discounts to a 'Buy X, get Y' deal with 3 tiers, you could say:
"Change this offer type from Quantity breaks to Buy X get Y for all products. Tiers: - Buy 1 at the regular price - Buy 2, get 1 free (label: 'Popular') - Buy 3, get 2 free (label: 'Best Value') Keep the offer in draft so I can review it first."
What the customer sees:
| Option | What They Pay For | What They Receive | Badge |
|---|---|---|---|
| Tier 1 | 1 unit | 1 unit | None |
| Tier 2 | 2 units | 3 units | Popular |
| Tier 3 | 3 units | 5 units | Best Value |
Shoppers see exactly how many extra units they get for free, so each tier feels like a real reward and nudges them to move up.
To go back to the original tiers:
"Switch back to Quantity breaks for all products with 3 tiers: 1 unit at full price, 2 units 5% off, 3 units 10% off."
2. Change the Layout
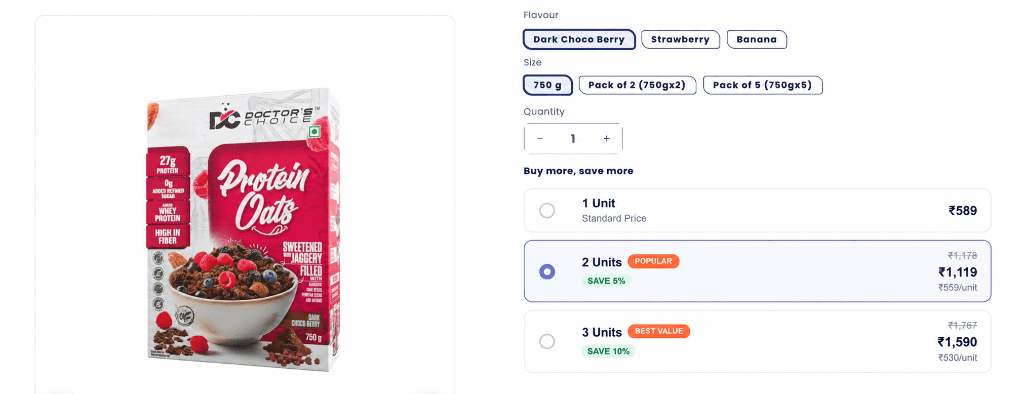
- Vertical list: Stacked offer rows with radio selection. Compact and mobile-friendly.
- Horizontal cards: Side-by-side offer cards. Each tier stands out clearly, which suits three tiers well.
Prompts to adjust the layout:
"Change the offer layout to Horizontal cards so the three tiers appear side by side on all product pages."
"Switch the layout back to Vertical list with radio selection."
3. Change the Color Theme, Font, and Styling
Describe the aesthetic you want instead of hunting through nested settings menus:
- "Update the design to match my brand: use deep navy (#1B2559) for the selected card border and headline, orange (#F0724A) for the badges, and a light lavender background for the selected option."
- "Change the font to a bold, rounded sans-serif for the headline and keep the prices in a clean, medium-weight font."
- "Make the corners more rounded, increase the spacing between cards, and make the selected option's border thicker."
- "Make the 'Best Value' badge green and the 'Popular' badge orange."
Good styling prompts name the element (badge, border, headline, price), the change (color, size, font), and a reference (a hex code or 'match my brand').
4. Change the Title, Headline, and Copy
Rename the headline:
"Rename the headline from 'Buy more, save more' to 'Stock up and save'."
Add a subtitle:
"Add a subtitle under the headline: 'The more you buy, the more you save.' Keep it short."
Change badge and savings text:
"Rename the 'Popular' badge to 'Most Picked' and the 'Best Value' badge to 'Biggest Saving'. Change 'SAVE 5%' to '5% OFF'."
Match a specific brand tone of voice:
"Rewrite the headline and badges in a friendly, premium tone for my store. Give me 3 options before applying one."
Tips for Writing Better Prompts
- Set the scope: Say 'all products', or name a specific collection if you want to narrow targeting.
- Provide exact numbers: '5% off for 2, 10% off for 3' is always better than 'give a small discount'.
- Describe labels and styling: Specify which tier should be highlighted and how badges should appear.
- Always request a draft first: Review the drafted changes in your WeUpsell dashboard before publishing.
- Make one change at a time: Iterative refinement makes it simple to test and dial in the perfect look.
What to Track After Publishing
- Average Order Value (AOV): Monitor the increase in overall revenue per checkout.
- Units Per Order (UPT): Track whether more shoppers are choosing 2 or 3 items over single units.
- Tier selection breakdown: See what percentage of buyers select the 'Popular' tier vs the 'Best Value' tier.
- Product page conversion rate: Ensure that introducing quantity tiers does not increase drop-offs.
You can also ask Claude directly to pull a performance summary from WeUpsell: 'How has my store-wide volume discount performed over the last 14 days?'
Try It on Your Own Store
- Connect Claude to WeUpsell with MCP
- Copy the first prompt and adjust the tiers and percentages to fit your product pricing.
- Review the draft, then refine the offer type, layout, design, and copy with conversational follow-up prompts.
- Publish when you're completely satisfied.
Up next in this series: Adding a high-converting Cart Drawer upsell without touching the dashboard → Read Guide.
Can I apply volume discounts to only specific collections?
Yes! While this guide demonstrates a store-wide volume discount for all products, you can tell Claude to target specific collections, tags, or product vendors (e.g. 'Apply this volume discount only to the Apparel collection').
Do discounts stack with other promo codes?
WeUpsell integrates with Shopify's native discount engine, so you can configure whether quantity breaks combine with other order discounts or gift cards in your Shopify admin settings.
What happens if a customer buys variants of different colors/sizes?
You can choose whether quantity breaks apply per single variant or across different variants of the same product, giving shoppers maximum flexibility when buying bundles.
Do I need coding experience to connect Claude and WeUpsell?
No coding is required. WeUpsell uses Model Context Protocol (MCP), meaning you simply paste your connection URL into Claude Settings and approve the connection.